
- Home
-
Tour ▼
- Project Management
- Ticketing System
- Time Tracking
- CRM
- Asset Management
- Field Service Management
- Employee Monitoring
- Productivity Suite
- Expense Tracker
- Event Management
- Hiring
- Billing And Invoicing
- Performance Review
- Leave Management
- Industries ▼
-
Lets Compare ▼
- 10to8
- 17hats
- Abacus
- Accelevents
- Accelo
- ActiveCollab
- Acuity Scheduling
- ADP TotalSource
- Agile CRM
- AI Field Management
- Anglepoint
- ApplicantStack
- Appointeze
- Appointlet
- Appointy
- Aptean
- Asset Panda
- AssetTiger
- Asset Infinity
- Autotask
- Avaza
- Awork
- BambooHR
- Basecamp
- Big Biller
- BigTime
- Birdview
- Bitrix24
- BiznusSoft
- Bizzabo
- Bonusly
- Bookeo
- Booksy
- Bookwhen
- Box
- BQE
- Breeze
- Bryq
- Bullhorn
- Cal
- CalendarSpots
- Capsule CRM
- Ceipal
- Certify
- Cheqroom
- Clarizen
- ClearPathGPS
- ClickUp
- Clio
- Clockodo
- Close
- Cloudaware
- Commusoft
- Concur
- Confluence
- ConnectWise
- CONREGO
- Corpay
- Darwinbox
- DeskTrack
- Dext
- Docuware
- Doodle
- Dovico
- DreamzCMMS
- Dropbox Business
- eFileCabinet
- Egnyte
- eMaint
- Epicor
- Eptura
- EventBrite
- Eventcombo
- EventMobi
- Eventsair
- Eventzilla
- ExpensePath
- ExpensePoint
- Expensify
- EZ Office Inventory
- EZO
- FactorialHR
- FieldEdge
- FieldPulse
- Fiix
- FreshBook
- Freshdesk
- Freshservice
- Freshteam
- Freshworks
- Front
- Furious Squad
- GigaBook
- GigaTrak
- Global Shop Solutions
- GoCodes
- GoFMX
- GoodDay
- Google Drive
- Gusto
- Hardcat
- Halogen Software
- Heeros
- Hive
- Housecall Pro
- HubSpot
- Idrive
- Infraspeak
- InLoox
- Insightly
- InvGate
- Invoicera
- Invoice2go
- Ivanti
- Jane App
- JazzHR
- Jira
- Jobber
- Joblogic
- Jumpshare
- Kantata
- Keap
- Keka
- Kickserv
- Koalendar
- Koofr
- Lansweeper
- Limble CMMS
- Livetecs
- Lunacal
- Mega
- Microsoft Planner
- Motivosity
- NetSuite
- Nextcloud
- Nextiva
- Nimble
- Odoo
- Okappy
- OrangeHRM
- OnceHub
- OneDrive
- Opendrive
- Paymo
- Pcloud
- Performance Pro
- Pheedloop
- Picktime
- Pipedrive CRM
- Pipefy
- Planning Pod
- Pleo
- Podio
- Pro Workflow
- PurelyHR
- QuickBooks
- Rainfocus
- Ramco
- Ravetree
- Razonsync
- Recruiterflow
- Reftab
- Replicon
- RescueTime
- Rippling
- Rocket Matter
- Rydoo
- Saba Talent
- Sage HR
- Salesforce
- Samepage
- SavvyCal
- Schedulista
- Scoro
- Service Cloud Software
- Service Fusion
- ServiceNow
- ServiceSight
- Service Trade Commercial
- Setmore
- Sharefile
- SharePoint
- Signinapp
- SimplyBook
- SnapAppointments
- Snipe-IT
- SolarWinds
- Square Appointments
- Stackfield
- Stampli
- STEL Order
- Streak
- SugarCRM
- SuiteCRM
- SuperSaaS
- Swoogo Events
- Sync
- SyncStream
- Taiga
- Teamgantt
- Teamtailor
- Teamwork
- Time Doctor
- TimeTap
- Tipalti
- Toggl
- Trafft
- Tresorit
- TriNet
- UKG
- UpKeep
- Upland
- Vagaro
- vCita
- vfairs
- Vonage
- Vtiger
- Wasp Barcode
- Webexpenses
- WebHR
- Whova
- Workable
- WORKetc
- Workiz
- Workstatus
- Wrike
- Xero
- XING Events
- YouCanBook
- Zeeg
- Zencal
- Zendesk
- Zoho CRM
- Zoho Expense
- Zoho People
- Zoho Projects
- Zoho Recruit
- Zoho Workdrive
- Downloads
- About Us
- Contact
- Blog

- Try for Free
- Pricing & Sign Up
- Live Demo
-

Knowledge Based Article
Add Client
In this section, clients are added. This helps to maintain a proper record of the clients. To add a new client, follow the below given steps.
 For an instructional demonstration video click here.
1. Go to Full Menu > Project > Client.
2. Click the 'Add' icon.
3. Enter the email ID and click on 'Next'. Then enter the required information in General and Advanced Settings.

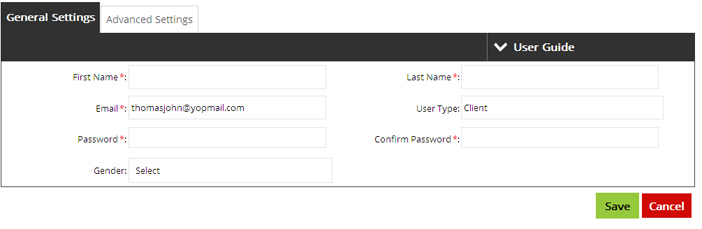
4. Click 'Save' to create a new client.
To edit: Click on the Client in listing and make the required changes.
To delete: 'Tick' mark the Client in listing and remove it by clicking on 'Delete' icon.
To enable and disable Client: Click on the 'Cross' icon to enable or 'Check' icon to disable the Client.
To search the Client: Type the name of the Client in the search bar and click on 'Search' icon.
Plans
Request For Demo Buy NowSocial Links

Office Address
Tour
- Project Management
- Ticketing System
- Time Tracking
- CRM
- Asset Management
- Field Service Management
- Event Management
- Expense Tracker
- Hiring
- Billing and Invoicing
- Appointments Calendar
- Performance Review
- Leave Management
- Screenshot Tracking
- Unified Communication
- Resource Scheduling
- Knowledge Base
- Personalized Dashboard
- Report
- Employee Management
- Client Portal
- Cloud Storage
- Approval Rules & Auditing
- Utility-Billing-Software
- Employee Monitoring
- Productivity Suite
- 3rd Party Integration
- Organization Chart
Other Links
- Pricing & Sign Up
- Testimonials
- Integration
- More Resources
- Recruitment Software
- Online Invoicing Software
- Remote Work Monitoring
- Expense Tracking Software
- FSM Software for Healthcare
- Field Service Management Software
- FSM Software
- Talygen IT Asset Management Software
- Project Management Software For Construction
- IT Asset Management Solutions
- FSM Software For Small Business
- Online Invoicing Software Guide For Small Businesses
- Project Management Software For Construction
- It Infrastructure Managed Services
Support Pages
-
 Rated
4.95/5.0
by
325+
Reviews
Rated
4.95/5.0
by
325+
Reviews