

- Home
-
Tour ▼
- Project Management
- Ticketing System
- Time Tracking
- CRM
- Asset Management
- Field Service Management
- Employee Monitoring
- Productivity Suite
- Expense Tracker
- Event Management
- Hiring
- Billing And Invoicing
- Performance Review
- Leave Management
- Industries ▼
-
Lets Compare ▼
- Abacus
- Autotask
- Basecamp
- Bitrix24
- Certify
- Clarizen
- Clio
- Clockodo
- Concur
- ConnectWise
- DeskTrack
- Dext
- Dovico
- Epicor
- ExpensePath
- ExpensePoint
- Expensify
- FreshBook
- Global Shop Solutions
- Insightly
- Invoice2go
- Livetecs
- MicrosoftPlanner
- NetSuite
- Paymo
- Podio
- Pro Workflow
- QuickBooks
- Replicon
- Rocket Matter
- Rydoo
- Salesforce
- SharePoint
- SugarCRM
- Time Doctor
- Toggl
- WORKetc
- Wrike
- Zoho CRM
- Zoho Expense
- Zoho Projects
- Downloads
- About Us
- Contact
- Blog

- Try for Free
- Pricing & Sign Up
- Live Demo
-

Knowledge Base Article
Manage Gantt Chart
Talygen helps you to manage your projects from a single screen with Gantt chart. Follow the below given steps to learn managing Gantt chart.
 For an instructional demonstration video click here.
1. Go to Full Menu > Project.
2. Click on the gantt chart icon of the particular project.
3. Click on the project name and enter the description. Select the status, start date and end date.
4. Enter the hours to be billed and billability. Click on Save to update the details
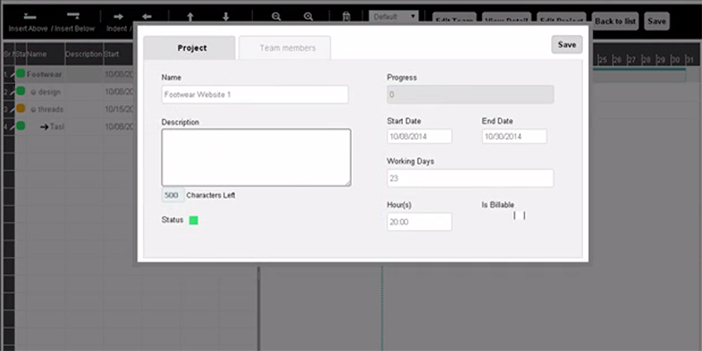
5. To get the Team members details, click on Project name and then click on Team members tab.
6. To create task, click on Insert Below and enter the project name. Now click on task name in Gantt chart.
7. Enter the description, select the status, start date and end date. Enter the hours to be billed and billability. Click on Save to update the task details.
8. To create the sub task, create a new task and click on ‘indent’. The Task will get indented into the parent task.
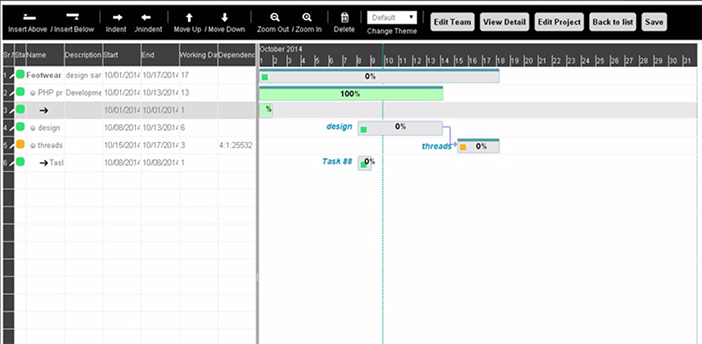
9. Click on the sub task and enter the description and select the status, start date and end date. Enter the hours and billability. Click on save to update the information.
10. Click upon the task to create dependency. Select the Task and days for dependency and click save. To add the resources, click on the task and select the users. Click on Save.
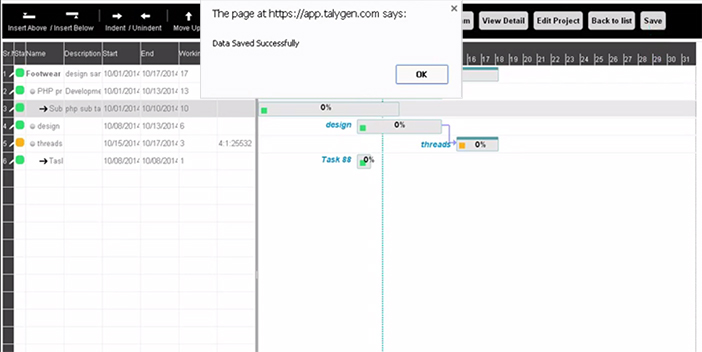
11. Click upon ‘Save’ button at your Gantt chart screen to save the complete project changes.

Tour
- Project Management
- Ticketing System
- Time Tracking
- CRM
- Asset Management
- Field Service Management
- Event Management
- Expense Tracker
- Hiring
- Billing and Invoicing
- Appointments Calendar
- Performance Review
- Leave Management
- Screenshot Tracking
- Unified Communication
- Resource Scheduling
- Knowledge Base
- Personalized Dashboard
- Report
- Employee Management
- Client Portal
- Cloud Storage
- Approval Rules & Auditing
- Utility-Billing-Software
- Employee Monitoring
- Productivity Suite
- 3rd Party Integration
- Organization Chart
Other Links
- Pricing & Sign Up
- Testimonials
- Integration
- More Resources
- Recruitment Software
- Online Invoicing Software
- Remote Work Monitoring
- Expense Tracking Software
- FSM Software for Healthcare
- Field Service Management Software
- FSM Software
- Talygen IT Asset Management Software
- Project Management Software For Construction
- IT Asset Management Solutions
- FSM Software For Small Business
- Online Invoicing Software Guide For Small Businesses
- Project Management Software For Construction
Support Pages
-
 Rated
4.95/5.0
by
325+
Reviews
Rated
4.95/5.0
by
325+
Reviews